The Process of Making my Portfolio Website with Sveltekit: Simple yet fun!
May 4, 2025
20 minute read
It’s been long overdue, but I’ll finally show how I made this website, including this blog, all from Svelte and Sveltekit! I’ve been trying to make a portfolio website for a few years, with varying levels of success and failure in a couple cases, but I feel like this time actually looks decently okay!
Choice of Framework
For this portfolio, I chose to use Sveltekit. I’ve previously worked with Svelte before on a school project, and I really enjoyed how declarative it really is! Although I haven’t worked with React in a project yet, I found Svelte to be easier to read and grasp compared to React.
Regarding metaframeworks, I’ve heard good things about Astro. I chose to stick with Sveltekit though, since it’s the default with Svelte.
Static Content (Portfolio)
First, the “static static” content. This includes my home page, about me, projects, etc.
Designing the site
Before I started, I first tried to make a sketch/prototype of what the site should look like in Figma.
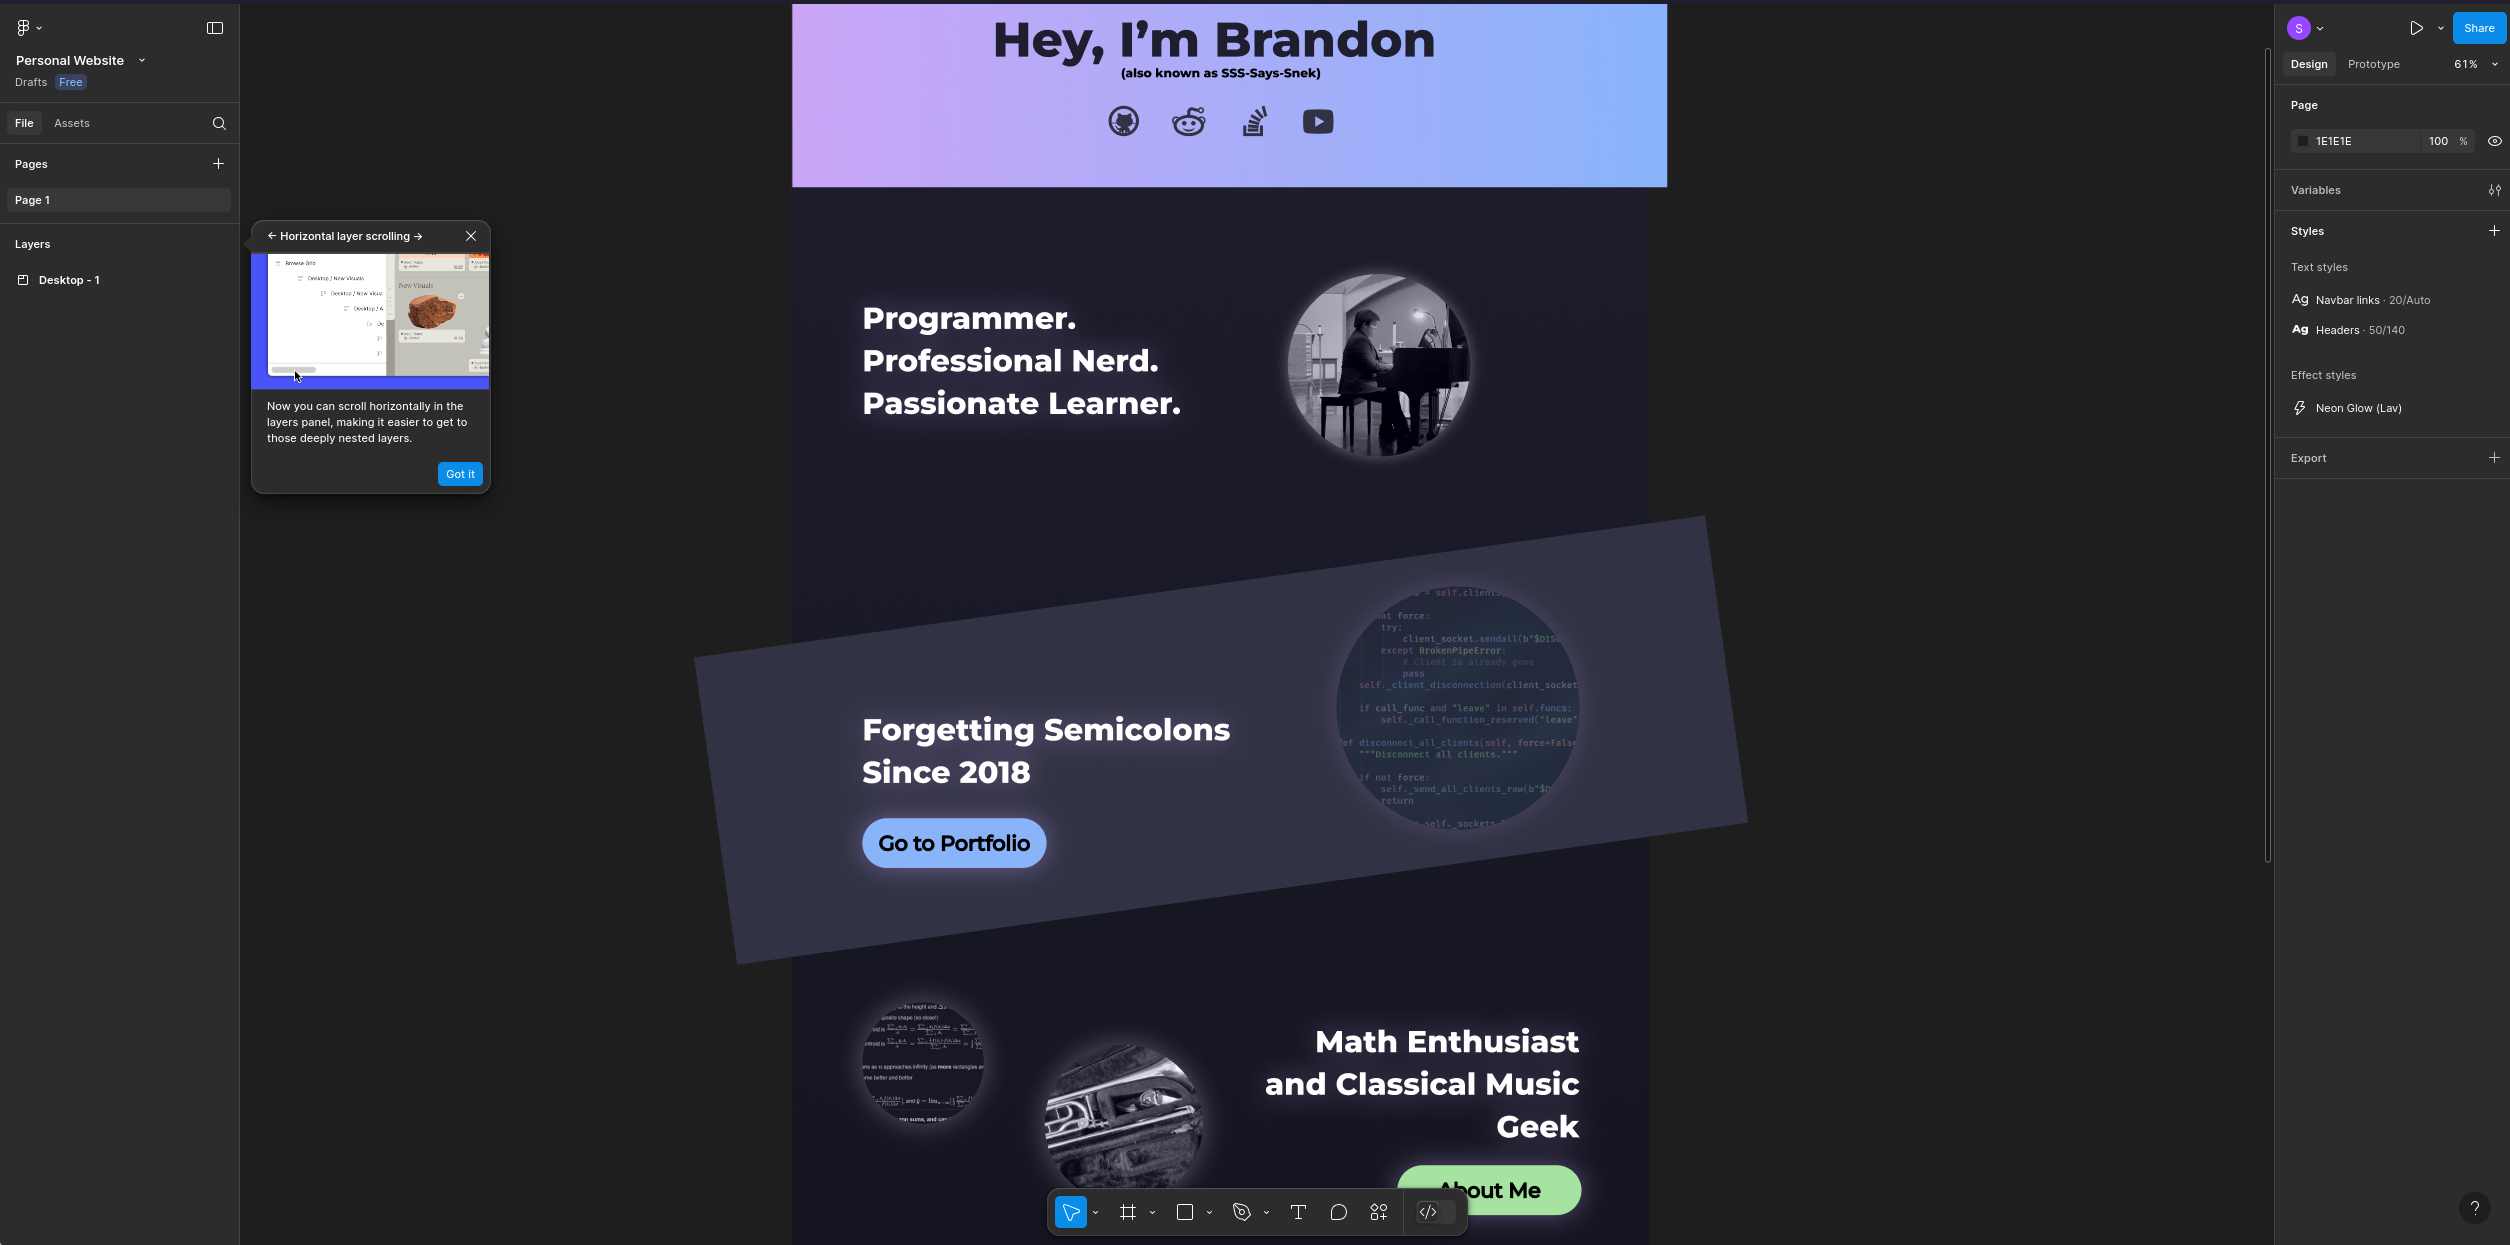
I used the well-known Catppuccin Mocha theme, partially because I was lazy, but also partially because I used the colorscheme when ricing my linux desktop and because I thought it matched well with what I was trying to go for. This part of actually finding a design was probably the hardest; I had no idea what looked good, so I honestly just made something up until it looked passing.
Building the pages and styling with CSS
Writing HTML for the pages was extremely straightforward. Now that I had a design in mind, it didn’t take long to write the basic content of my portfolio (i.e the home page and about me). What was tricky was definitely the CSS. Although I usually used Tailwind for a more modular CSS approach, in this project, I just used pure, basic CSS and nothing more.
Because Svelte already separated CSS on a component basis, it made working with CSS slightly easier. However, I was still iffy on a lot of things I wanted to accomplish in the design, such as how I was going to position all the different images on the homepage.
- Kevin Powell: He has awesome tutorials on how to design a responsive website and has a lot of cool demonstrations on niche CSS features and the process of designing cool frontend stuff.
- CSS Tricks
- Practice! Making more websites (and just projects in general) greatly improves your skills.
Many hours later, I finished a basic layout for my pages. There’s not really that much to say about the truly-static content; find a good layout, write out the HTML, and things should fall into place relatively fast. What was much harder to do was the blog…
“Dynamic” Content (Blog)
Now, the “dynamic static” part. My goal was to make a blog that was:
- Easy to write: It should be mainly written in markdown and not just be a big ahh svelte file
- Easy to maintain: All I have to do should be to upload the blogpost and files. I shouldn’t have to be messing arround with code
- Latex and syntax highlighting supportable: Since there’ll be a lot of science-related blogposts here, it must be able to support LaTeX and syntax highlighting for multiple languages
- Svelte interfacable: I want to be able to use svelte in the blog to spice up the UI and make stuff look more interesting
With this, here’s how my blog works.
How the blog works
/blog/: The main blog page
The main driving force behind the blog is an API within the site. For example, in blog/, there is a +page.svelte and a +page.server.ts with the following:
<!-- +page.svelte -->

<script lang="ts">
  let { data }: { data: { posts: Post[] } } = $props();
  ...
</script>

{#each data.posts as post}
  <a href={`/blog/${post.slug}`} class="post">
    <div class="title-container">
...
// +page.server.ts

export async function load({fetch}: {url: URL, fetch: Function}) {
  let postRes = await fetch(`/api/posts`);
  let posts = await postRes.json();

  return { posts };
}
Basically, whenever someone’s trying to reach the /blog/ page, which is where all the blogposts are shown, sveltekit fetches all the posts with /api/posts (line 4). Note that this happens on the server side only,
as indicated by the filename being +page.server.ts.
Then, it is made available to the component by way of the data prop in +page.svelte (line 4), which then is used by the component with a loop (line 8) that renders all the blog summaries appropriately.
This raises another question: How does the API work, and how does it get those local files and reads them? Before we answer that, though, let’s talk about what the files actually look like on disk.
Representation of blogposts
/api/: The API
Here’s the code for all relavent parts of the API:
// /api/posts/+server.ts

import { json } from '@sveltejs/kit';
import fetchPosts from '$lib/fetchPosts'

export const GET = async () => {
    let posts = await fetchPosts({limit: 10});

    return json(posts);
}
// $lib/fetchPosts.ts
import type { Post } from "$lib/interfaces";
const fetchPosts = async ({ offset = 0, limit = 10, category = '' } = {}) => {
const posts: Post[] = await Promise.all(
Object.entries(import.meta.glob('/src/lib/posts/*.md')).map(async ([path, resolver]) => {
const { metadata } = await resolver()
const slug = path.split('/').pop().slice(0, -3)
return { ...metadata, slug }
})
)
let sortedPosts = posts.sort((a, b) => new Date(b.date).getTime() - new Date(a.date).getTime()) // Finnicky TS PMO
if (category) {
sortedPosts = sortedPosts.filter(post => post.categories.includes(category))
}
if (offset) {
sortedPosts = sortedPosts.slice(offset)
}
if (limit && limit < sortedPosts.length && limit != -1) {
sortedPosts = sortedPosts.slice(0, limit)
}
posts.forEach(post => {
post.title = post.title.replace('~', ':')
})
return posts
}
export default fetchPosts;First, in +server.ts, we see that it establishes a GET endpoint that offloads everything to the fetchPosts function (line 7). In the arguments, it asks for a limit of
10 posts.
However, the bulk of the action happens in fetchPosts. Specifically, lines 6-11 is where all the posts and their metadata are retrieved. From my understanding, line 7 utilizes a Vite import function to
import all the .md files with the specified glob. This import functionality is, I think, driven through mdsvex, which is a library that allows people to transform Markdown into Svelte components and then HTML. Taking
a look at my Svelte config file
const config = {
    extensions: [".svelte", ".md"],
	preprocess: [
        vitePreprocess(),
        mdsvex({
            extensions: [".md"],
            highlight: {
                highlighter: async (code, lang = 'text') => {
                    const html = escapeSvelte(
                        highlighter.codeToHtml(code, {
                            lang,
                            theme,
                            transformers: [
                                transformerNotationFocus(),
                            ]
                        })
                    );
                    return html;
                }
            },
            remarkPlugins: [
                remarkMath
            ],
            rehypePlugins: [
                rehypeKatexSvelte,
                rehypeSlug,
                rehypeAutolinkHeadings,
                toc,
                sectionize.default
            ]
        })
    ],
...
You can see that I have a mdsvex preprocessor that takes in .md files and applies highlighting, remark plugins, and rehype plugins, then converts them into simple HTML.
It can even allow me to use Svelte components within the markdown so I can spice things up!
See?
Anyway, I’m thinking that on import, the preprocessor is run, and mdsvex parses through the metadata and allows us to retrieve it with a “resolver” function (line 8 of fetchPosts.ts). The metadata
will ultimately be repackaged into a Post object so that we have easy access to the data.
We then get the slug from the path by splitting up the path and popping the last element so that we can get a.md from src/lib/posts/a.md. Then, we slice and ignore the last 3 characters, which leaves us
with the slug a. This is used to create the links to the actual posts.
Now that we have all of the slugs and metadata we need, we sort the posts by most recent and slice the posts according to the limiting number of posts. Then, I just do some processing of the titles,
since having a colon in the title metadata will trip up mdsvex. Finally, the posts are returned for the API’s use and for /blog/+page.svelte to actually build the UI.
/blog/[post]: The content
Believe it or not, getting the actual content of the blogpost and displaying it is easier than displaying a list of blogposts!
// /blog/[post]/+page.ts

export const load: PageLoad = async ({ params }) => {
  // try import for 404
  try {
    let post = await import(`../../../lib/posts/${params.post}.md`);

    return {
      PostContent: post.default,
      metadata: { ...post.metadata, slug: params.post }
    };

  } catch(err) {
    error(404);
  }
}
<!-- /blog/[post]/+page.svelte -->
<script lang="ts">
let { data } = $props();
let { PostContent } = data;
let post: Post = data.metadata;
...
</script>
<div class="frontmatter">
<h1 class="post-title">{post.title.replace('~', ":")}</h1>
<div class="info">
<div class="icon-text">
<MdiCalendar class="icon" />
<p>{post.date}</p>
</div>
<div class="icon-text">
<MdiClock class="icon" />
<p>{post.minRead} minute read</p>
</div>
</div>
</div>
<hr>
<div class="md-content">
<PostContent />
</div>
...First, the directory structure. The bracketed [post] signifies a parameter/slug in Sveltekit that we’re able to access and do different stuff depending on it. You
can see that in line 6 of +page.ts, we access the parameter through the params parameter that’s defined in the function header and import the corresponding
blogpost markdown
like we did previously. We can then access HTML of the actual contents of the post with the .default attribute (line 9). We then package it and some more
metadata so that +page.svelte can use it.
When +page.svelte gets the data through props, we unpackage it into PostContent, which is now an HTML component, and post metadata (lines 6 & 7). Then, in line 29,
all we have to do to render the HTML is use it like any other Svelte component. This will then render the entirety of the blogpost. Put on some finnicky stuff with
the table of contents and CSS and we have a fully functional blogpost page!
Conclusion and Future Ideas
It was really fun tackling this challenge of making a portfolio website! I learned a lot about webdev, Svelte, and Sveltekit from this project, and it was well worth the few weeks that it took to develop! I’m really pleased with how it turned out, considering how bare-bones the previous website was…
I initially didn’t plan to include the blog at all; I wanted to make a separate website idiotexplains.com where I talk about concepts I find interesting yet sometimes completely over my head. However, in the end, I merged it with my portfolio, and now this is what you see.
There are still some things I want to improve with this portfolio over the course of the next couple months:
- Update my About Me. Right now, it’s rather sparse. In the future, I want to write more about my hobbies (games, worldbuilding, etc) and paint a better picture of who I am.
- Actually implement blog pagination. What I mean is that there is no way to scroll the next 10 pages once I have more than 10 pages 😅. I know it’s a major oversight; I was just lazy and thought that it’d be a while until I get to the point where I need pagination.
- Make the blog more interesting. Both in terms of content and styling. Regarding content, I might talk more about some more personal stuff, although I still love talking about nerdy stuff. Regarding styling, it doesn’t look bad right now. It’s just that I have all the tools set up to make things a lot more cool and fun.
Anyway, I hope you learned at least something from my (rather messy) process, and I’ll see yall later! Bye 🥀🥀🥀